Full Stack5 min read
Integrating Stripe Payments in React
Most Stripe tutorials stop at “the charge went through.” This one covers the parts that actually matter in production: where the secret lives, who decides the price, and why you fulfill on a webhook instead of a redirect.
Taking money is one of those features that looks trivial in a demo and gets serious the moment it's real. I've integrated Stripe into a few products, and almost every bug or security review came down to the same handful of questions: where does the secret key live, who decides how much to charge, and when do you actually consider an order paid? Below is a modern, secure Stripe integration in a Next.js app that gets those answers right.
Pick the right integration
Before any code: Stripe has an order of preference, and reaching for the lowest level by default is a common mistake. Roughly:
- Payment Links: no code, for simple one-off products.
- Checkout: Stripe-hosted or embedded. The right choice for most web apps.
- Payment Element: an embedded UI component for when you need a custom, in-app checkout.
I'll use the Payment Element here because it shows the real React integration. If you just need to take a payment, though, hosted Checkout is less code and less surface area. Either way, skip the legacy Card Element. The Payment Element replaces it and gives you dynamic payment methods (cards, wallets, local methods) for free.
The golden rule: the server owns the money
The single most important idea in any payment integration:
- Your publishable key (
pk_…) is safe in the browser. Your secret key lives only on the server. Never put it in client code or a committed.env. Use a restricted key (rk_…) with just the permissions this service needs. - The amount is decided on the server, from your own catalog or cart. If the browser tells you what to charge, an attacker tells you what to charge.
- An order is "paid" when Stripe tells your server so via a verified webhook, not when the user's browser lands on a success page.
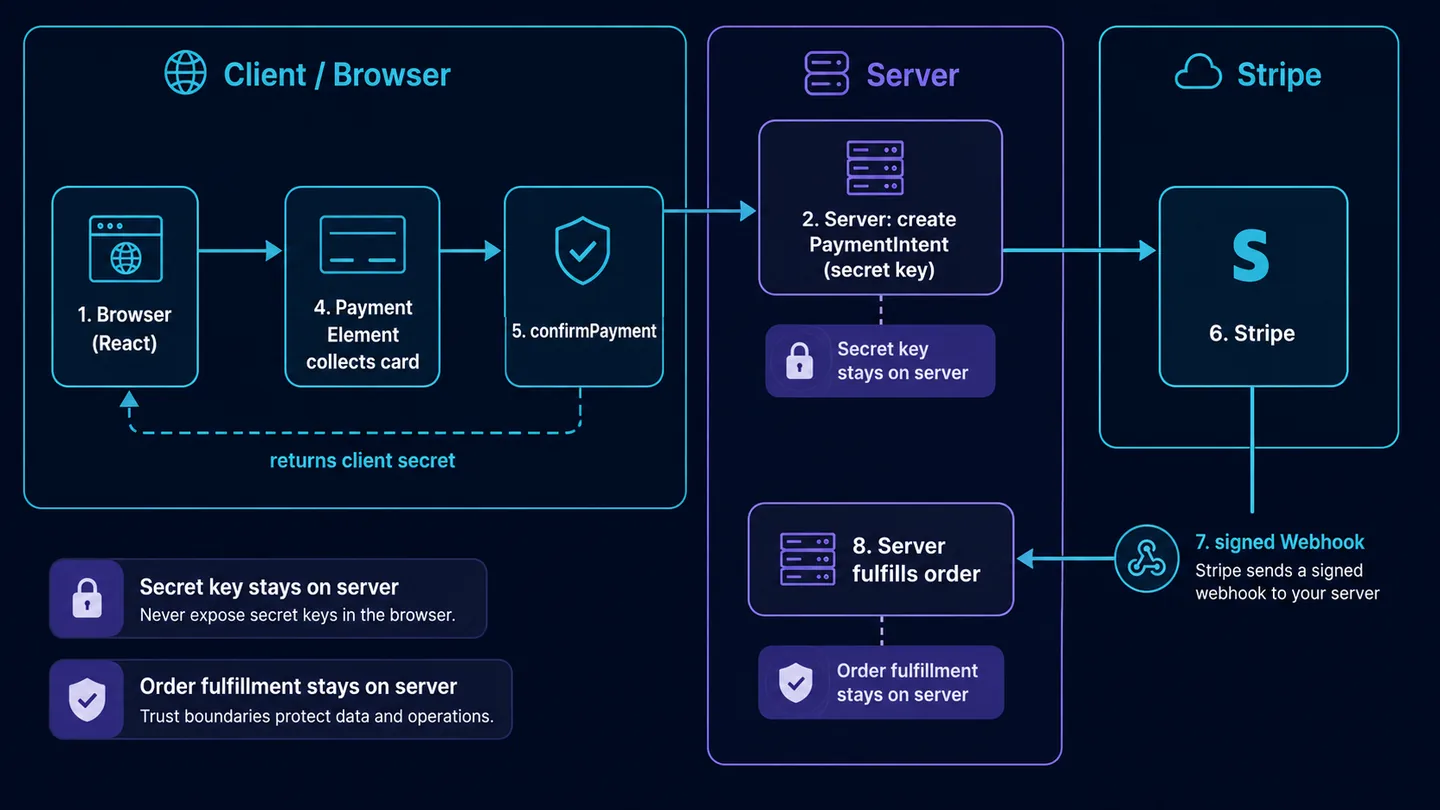
1. Install and configure
npm install stripe @stripe/stripe-js @stripe/react-stripe-jsKeys go in environment variables, and only the publishable key is allowed to be public:
# .env.local  (never commit this)
NEXT_PUBLIC_STRIPE_PUBLISHABLE_KEY=pk_test_...
STRIPE_SECRET_KEY=rk_test_...        # a restricted key, scoped to least privilege
STRIPE_WEBHOOK_SECRET=whsec_...
A single server-only Stripe client, pinned to the current API version:
// lib/stripe.ts (server only)
import Stripe from "stripe";

export const stripe = new Stripe(process.env.STRIPE_SECRET_KEY!, {
  apiVersion: "2026-03-25.dahlia",
});
2. The server: create a PaymentIntent
The client asks to pay; the server decides the amount, creates the intent, and hands back only the
client_secret. Note three production details: the amount comes from our data, dynamic payment
methods are enabled, and an idempotency key makes a retried request safe. The client generates that
key once per checkout (crypto.randomUUID()) and sends the same one on every retry, so a retry gets
back the original PaymentIntent instead of creating a second one.
// app/api/payment-intent/route.ts
import { NextRequest, NextResponse } from "next/server";
import { stripe } from "@/lib/stripe";
import { priceCart } from "@/lib/catalog";

export async function POST(req: NextRequest) {
  // The client must send this. A key generated here would be new on every retry.
  // The client makes a new one only when the cart changes.
  const idempotencyKey = req.headers.get("x-idempotency-key");
  if (!idempotencyKey) {
    return NextResponse.json(
      { error: "Missing x-idempotency-key header" },
      { status: 400 },
    );
  }

  const { items } = await req.json();

  // Never trust an amount from the client. Compute it from your own catalog.
  const amount = await priceCart(items); // integer, in the smallest currency unit (cents)

  const intent = await stripe.paymentIntents.create(
    {
      amount,
      currency: "usd",
      automatic_payment_methods: { enabled: true }, // cards, wallets, local methods
      metadata: { /* orderId, userId, … */ },
    },
    { idempotencyKey },
  );

  return NextResponse.json({ clientSecret: intent.client_secret });
}
3. The client: the Payment Element
On the browser, load Stripe with the publishable key, fetch the client secret, and wrap the form
in <Elements>. The Payment Element renders every enabled payment method and handles PCI-sensitive
fields inside Stripe's iframe, so card data never touches your code.
// app/checkout/CheckoutForm.tsx
"use client";

import { useState } from "react";
import { loadStripe } from "@stripe/stripe-js";
import {
  Elements,
  PaymentElement,
  useStripe,
  useElements,
} from "@stripe/react-stripe-js";

const stripePromise = loadStripe(process.env.NEXT_PUBLIC_STRIPE_PUBLISHABLE_KEY!);

export function Checkout({ clientSecret }: { clientSecret: string }) {
  return (
    <Elements stripe={stripePromise} options={{ clientSecret, appearance: { theme: "night" } }}>
      <PaymentForm />
    </Elements>
  );
}

function PaymentForm() {
  const stripe = useStripe();
  const elements = useElements();
  const [error, setError] = useState<string | null>(null);
  const [submitting, setSubmitting] = useState(false);

  async function handleSubmit(event: React.FormEvent) {
    event.preventDefault();
    if (!stripe || !elements) return; // Stripe.js still loading

    setSubmitting(true);
    const { error } = await stripe.confirmPayment({
      elements,
      confirmParams: { return_url: `${window.location.origin}/checkout/complete` },
    });

    // We only get here if confirmation failed; on success Stripe redirects.
    if (error) {
      setError(error.message ?? "Something went wrong.");
      setSubmitting(false);
    }
  }

  return (
    <form onSubmit={handleSubmit}>
      <PaymentElement />
      <button type="submit" disabled={!stripe || submitting}>
        {submitting ? "Processing…" : "Pay"}
      </button>
      {error && <p role="alert">{error}</p>}
    </form>
  );
}
4. Fulfill on the webhook, not the redirect
Demos skip this step, but production can't. The return_url redirect is just the user's browser, and
browsers get closed, lose connection, or get faked. The source of truth is a signed webhook from
Stripe. Verify the signature, then fulfill idempotently.
// app/api/stripe/webhook/route.ts
import type Stripe from "stripe";
import { stripe } from "@/lib/stripe";
import { fulfillOrder } from "@/lib/orders";

export async function POST(req: Request) {
  const body = await req.text(); // raw body is required to verify the signature
  const signature = req.headers.get("stripe-signature")!;

  let event: Stripe.Event;
  try {
    event = stripe.webhooks.constructEvent(body, signature, process.env.STRIPE_WEBHOOK_SECRET!);
  } catch {
    return new Response("Invalid signature", { status: 400 });
  }

  if (event.type === "payment_intent.succeeded") {
    const intent = event.data.object as Stripe.PaymentIntent;
    await fulfillOrder(intent); // mark paid, grant access, email receipt; safe to run twice
  }

  return new Response(null, { status: 200 });
}
Run it locally with the Stripe CLI: stripe listen --forward-to localhost:3000/api/stripe/webhook.
5. Test it
Stripe's test cards exercise the paths real users will hit. A few essentials:
4242 4242 4242 4242: a clean success.4000 0025 0000 3155: triggers 3D Secure authentication.4000 0000 0000 9995: a decline, so you can prove your error handling works.
Use any future expiry date and any CVC. Test the failure and authentication paths, not just the happy one, because that's where real integrations break.
Production checklist
Before this goes live:
- Restricted key, server-side only, with least-privilege scopes. Rotate it when people leave.
- Amounts computed server-side, always.
- Webhook signatures verified, fulfillment idempotent, and the heavy work done off the request.
- Dynamic payment methods enabled in the Dashboard rather than hardcoded.
- HTTPS everywhere, and keys kept out of source control (a pre-commit hook to catch
sk_/rk_strings is cheap insurance).
Conclusion
A solid Stripe integration depends less on the API calls than on a few principles: the server owns the secret and the price, the client only ever sees a publishable key and a client secret, and an order isn't real until a verified webhook says so. Get those right and everything else, like wallets, 3D Secure, and new payment methods, is mostly configuration. Building the payment form is easy. Making the result trustworthy is where the work goes.